Adding Custom Content to a Tamagotchi Smart: Difference between revisions
Jump to navigation
Jump to search
(Added starting info to patching the smart) |
Puggernaut (talk | contribs) m (added some instructions) |
||
| Line 7: | Line 7: | ||
1) Download the driver and asprogrammer [https://github.com/nofeletru/UsbAsp-flash/releases here] | 1) Download the driver and asprogrammer [https://github.com/nofeletru/UsbAsp-flash/releases here] | ||
download the entire zip file - AsProgrammer_2.0.4.zip | |||
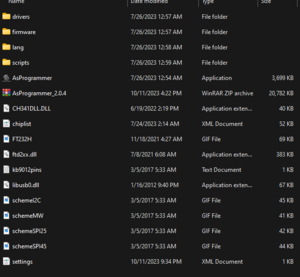
Unload into your files. It should look like this: | |||
[[File:1.png|left|thumb]] | |||
2) Go to drivers->CH341->Install both CH341PAR and CH341SER | |||
3)Plug in your device with your card to your computer | |||
4)Go to device manager | |||
WIP............. | |||
Latest revision as of 07:14, 12 October 2023
Materials to start:
-Connection from one of the Chips to the Computer (the jumper set up or a usb that you can insert the card in)
-Your Tamagotchi Smart
1) Download the driver and asprogrammer here
download the entire zip file - AsProgrammer_2.0.4.zip
Unload into your files. It should look like this:

2) Go to drivers->CH341->Install both CH341PAR and CH341SER
3)Plug in your device with your card to your computer
4)Go to device manager
WIP.............