Re-Flashing a Smacard: Difference between revisions
(Added programming portion to the guide.) |
m (Fixing the image alignment) |
||
| Line 52: | Line 52: | ||
With all that out of the way, plug in the Smacard to the microSD module. The gold contact (side with the writing on a Smacard) side should be facing the pins in your microSD module as shown. Ignore the wire coloring as mine is different from the setup example and I've soldered my jumpers directly to the module. | With all that out of the way, plug in the Smacard to the microSD module. The gold contact (side with the writing on a Smacard) side should be facing the pins in your microSD module as shown. Ignore the wire coloring as mine is different from the setup example and I've soldered my jumpers directly to the module. | ||
[[File:PXL 20240406 210557386~2.jpg|alt=A Smacard inserted in a microSD module.| | [[File:PXL 20240406 210557386~2.jpg|alt=A Smacard inserted in a microSD module.|thumb|none]] | ||
<u>Step 3 - Programming the Smacard</u> | <u>Step 3 - Programming the Smacard</u> | ||
| Line 58: | Line 58: | ||
It should look like this: | It should look like this: | ||
[[File:Neoprogrammer blank window.png|alt=A blank window after starting Neoprogrammer.| | [[File:Neoprogrammer blank window.png|alt=A blank window after starting Neoprogrammer.|thumb|none]] | ||
Make sure the correct USB programmer is selected in the menu. If you are using the one pictured, it should be "CH341A Black". | Make sure the correct USB programmer is selected in the menu. If you are using the one pictured, it should be "CH341A Black". | ||
[[File:Programmer selection dialogue box.png|alt=The dialogue box for picking the programmer type, with "CH341A Black" selected.| | [[File:Programmer selection dialogue box.png|alt=The dialogue box for picking the programmer type, with "CH341A Black" selected.|thumb|none]] | ||
Now click the chip with the question mark on the top bar. When you hover over it, it should say "Detect IC". On AsProgrammer, it will say "Read ID". | Now click the chip with the question mark on the top bar. When you hover over it, it should say "Detect IC". On AsProgrammer, it will say "Read ID". | ||
[[File:Detect IC Icon.png|alt=The icon for Detect IC| | [[File:Detect IC Icon.png|alt=The icon for Detect IC|thumb|none]] | ||
If you get "IC not responding", double check your jumper wiring and your Smacard orientation and try again. | If you get "IC not responding", double check your jumper wiring and your Smacard orientation and try again. | ||
[[File:IC not responding.png|alt=Picture of what happens when the connection is bad.| | [[File:IC not responding.png|alt=Picture of what happens when the connection is bad.|thumb|none]] | ||
Otherwise, you should see this: | Otherwise, you should see this: | ||
[[File:Detecting GD25Q16x.png|alt=Picture of Neoprogrammer detecting the flash chip.| | [[File:Detecting GD25Q16x.png|alt=Picture of Neoprogrammer detecting the flash chip.|thumb|none]] | ||
Click "select" to confirm the chip type. | Click "select" to confirm the chip type. | ||
| Line 72: | Line 72: | ||
Click the "Read IC" icon in the window. | Click the "Read IC" icon in the window. | ||
[[File:Read IC button.png|alt=The button to read an IC in Neoprogrammer.| | [[File:Read IC button.png|alt=The button to read an IC in Neoprogrammer.|thumb|none]] | ||
It should now start reading the chip. Make sure nothing comes loose during this process. Wait for it to finish, then go to the File menu and click Save (or hit Ctrl+S), and save the .bin file somewhere named whatever you want. If you want you can rip another copy and compare them in HxD to see if the files are identical to ensure your rip was good, but I won't be going over that in this guide. | It should now start reading the chip. Make sure nothing comes loose during this process. Wait for it to finish, then go to the File menu and click Save (or hit Ctrl+S), and save the .bin file somewhere named whatever you want. If you want you can rip another copy and compare them in HxD to see if the files are identical to ensure your rip was good, but I won't be going over that in this guide. | ||
Now that you have a backup of the original, find your .bin file you want to replace the Smacard with and open it. (File -> Open or hit Ctrl+O). Your window contents should now be different from what they were. | Now that you have a backup of the original, find your .bin file you want to replace the Smacard with and open it. (File -> Open or hit Ctrl+O). Your window contents should now be different from what they were. | ||
[[File:Neoprogrammer with .bin loaded.png|alt=Neoprogrammer with .bin file loaded showing the programming menu and what options should be checked.| | [[File:Neoprogrammer with .bin loaded.png|alt=Neoprogrammer with .bin file loaded showing the programming menu and what options should be checked.|thumb|none]] | ||
Now, click the arrow next to the blue "Write IC" icon, '''and make sure you have Erase, Write, and Verify checked before programming!''' | Now, click the arrow next to the blue "Write IC" icon, '''and make sure you have Erase, Write, and Verify checked before programming!''' | ||
| Line 82: | Line 82: | ||
Now, click the button that says "Write IC" and it should reprogram your Smacard after erasing it! | Now, click the button that says "Write IC" and it should reprogram your Smacard after erasing it! | ||
[[File:Successful Smacard programming.png|alt=A picture of Neoprogrammer after successfully flashing a Smacard. | [[File:Successful Smacard programming.png|alt=A picture of Neoprogrammer after successfully flashing a Smacard.|thumb|661x661px|none]] | ||
Your window should say "Success" and look similar to this. You can now remove the Smacard once it has finished and test it out. | Your window should say "Success" and look similar to this. You can now remove the Smacard once it has finished and test it out. | ||
If it doesn't work, double check you did everything correctly and your wiring is correct. You may also need to swap USB ports as some may not work. | If it doesn't work, double check you did everything correctly and your wiring is correct. You may also need to swap USB ports as some may not work. | ||
Revision as of 15:15, 6 April 2024
There are a few reasons you might want to flash different files onto a Smacard. For example, loading custom content, or loading the contents of another card. This is a simple tutorial to show you the step-by-step process. All it requires is some very simple hardware and software.
You will need:
- AsProgrammer, Neoprogrammer, or equivalent for your flasher
- A CH341A Programmer
- A Micro SD Card Module For Example (There are 2 types. Ensure the one you get has a short metal connector, not the long version. And that the pin header is pre-soldered)
- 6 Female to Female Jumper Wires For Example
Step 1 - Assemble the card reader
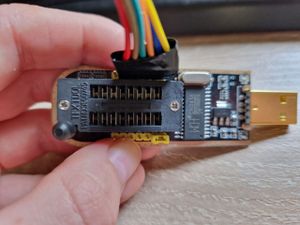
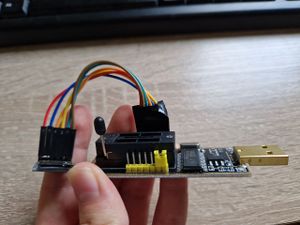
It's a simple job of plugging cables in the right places.
Cable colour doesn't matter as long as you keep the order the same.
For mine I did:
On the SD Card Module (left to right)
Red, Blue, Orange, Yellow, Green, Brown
On the CH341A (left to right)
Red, Brown, Green, Orange, Blue, Yellow
Refer to the pictures to ensure you've put them in the correct place
Step 2 - Smacard Initial Checks and Setup
Make sure you are using a Smacard as big or bigger than the .bin you want to write.
This example will be with a 2MB sized Smacard, all of which I will list below:
- Anniversary Party Friends
- En-tama Friends
- Kei-Tama Friends
- Magical Change
- Marine Change
- Nizoo Friends
- One Piece Friends
- Pixar Friends
- PUI PUI Molcar Friends
- Sanrio Characters
All other Smacards are 1MB and won't work for a .bin file from this list. I would recommend Nizoo Friends as of writing this (April 2024) if you have none of them, as at the time they are widely available and cheap.
If you have a differently sized Smacard the chip that shows up in your programmer will be different! It will still work with same size or smaller files but just be aware of this!
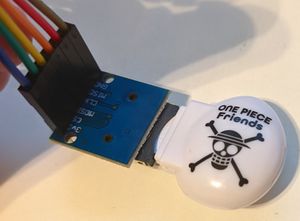
With all that out of the way, plug in the Smacard to the microSD module. The gold contact (side with the writing on a Smacard) side should be facing the pins in your microSD module as shown. Ignore the wire coloring as mine is different from the setup example and I've soldered my jumpers directly to the module.
Step 3 - Programming the Smacard
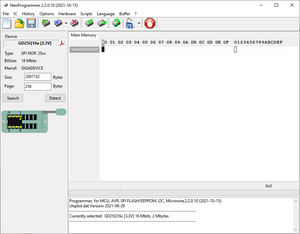
Plug in the USB programmer which should have the Smacard now connected to it and open your programmer of choice, I will be using Neoprogrammer.
It should look like this:
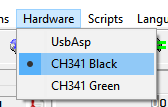
Make sure the correct USB programmer is selected in the menu. If you are using the one pictured, it should be "CH341A Black".
Now click the chip with the question mark on the top bar. When you hover over it, it should say "Detect IC". On AsProgrammer, it will say "Read ID".

If you get "IC not responding", double check your jumper wiring and your Smacard orientation and try again.

Otherwise, you should see this:
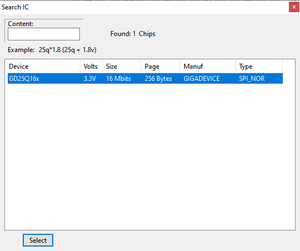
Click "select" to confirm the chip type.
On AsProgrammer, it will show GD25Q16 and GD25Q16B. Pick GD25Q16.
Click the "Read IC" icon in the window.

It should now start reading the chip. Make sure nothing comes loose during this process. Wait for it to finish, then go to the File menu and click Save (or hit Ctrl+S), and save the .bin file somewhere named whatever you want. If you want you can rip another copy and compare them in HxD to see if the files are identical to ensure your rip was good, but I won't be going over that in this guide.
Now that you have a backup of the original, find your .bin file you want to replace the Smacard with and open it. (File -> Open or hit Ctrl+O). Your window contents should now be different from what they were.
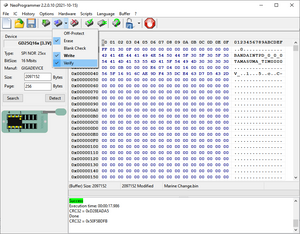
Now, click the arrow next to the blue "Write IC" icon, and make sure you have Erase, Write, and Verify checked before programming!
On AsProgrammer this is probably enabled by default but it should say "Unprotect->Erase->Program->Verify" when you hover over the "Program IC" icon (chip with red arrow).
Now, click the button that says "Write IC" and it should reprogram your Smacard after erasing it!
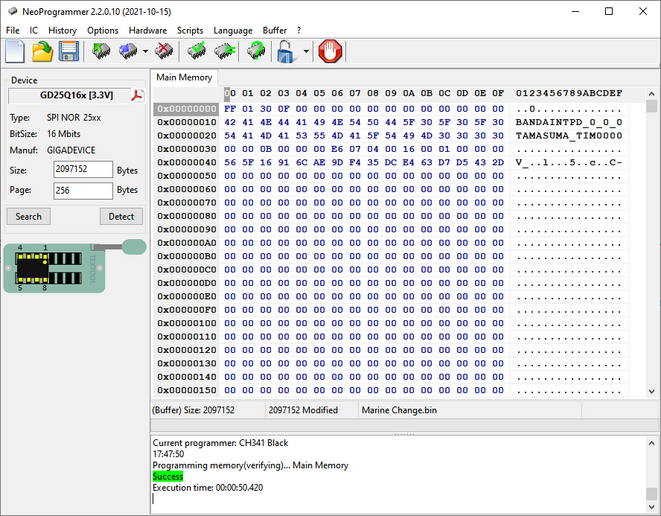
Your window should say "Success" and look similar to this. You can now remove the Smacard once it has finished and test it out.
If it doesn't work, double check you did everything correctly and your wiring is correct. You may also need to swap USB ports as some may not work.