Smart
Patching a Tamagotchi Smart to English without a custom SmaCard
Most commonly, the English patch is applied via a custom SmaCard, which you can either make yourself, or buy from someone who's selling it. However, if you'd prefer not to patch this way, it is also possible to apply the English patch by flashing the English firmware directly onto the chip. That’s what this guide is for!
This guide is intended to be helpful even if you have no firmware experience, the process is actually very simple.
You will need:
- A Tamagotchi Smart
- A CH341A programmer with a clip
- A Windows computer with AsProgrammer (Or a mac, with mac equivalent programming software)
- A copy of the English patch (Note - the patch file intended for the custom SmaCard method has an update header. Ensure the English patch file you have does NOT have this)
Guide written by #teallen, English patch created by #studded.net
You apply this patch at your own risk, neither me nor anyone else involved is responsible for any damage to your device. It’s important to follow the steps carefully, and make a backup of your firmware just in case anything goes wrong (Step 4)
Step by Step
1 - Download the correct version of the English patch
Not all patch files will work. If the file was made for patching via a custom-made smacard, it will have an update header. Patching your smart with a file like this Will Not Work. You can download the correct version of the patch HERE
USE TMGC_Smart_FW_RAW_[ENG]
2 - Open up your tamagotchi smart.
There are 4 screw caps that need to be removed, and 4 screws underneath them. I also remove the reset button, as it could easily get lost.
The chip you need to clip on to is at the bottom of the board, next to the reset button.
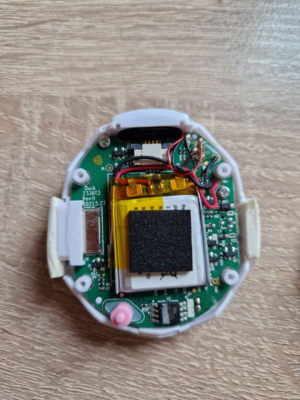
3 - Connect the smart to the CH341A programmer There’s a faint dot on one of the corners of the chip. Make sure the red wire on your clip is aligned with that dot.
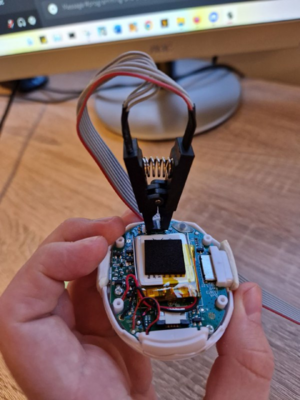
When connecting the other end of the clip to your CH341A programmer, ensure you’ve connected it the way I have in the pictures. (The clip module is plugged into the slots nearest the USB end of the device, the red wire is on the side furthest from the USB end)
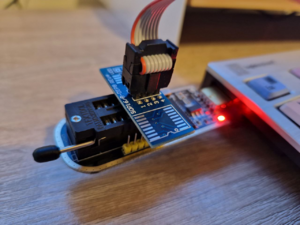
For both ends, make sure everything is connected solidly, or else it won’t work. You may have to try several times before the clip is able to make a good enough connection to be readable.
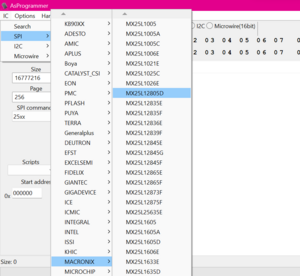
3 - Open AsProgrammer and under IC, select MX25L12805D
The chip is a KH25L12833FM21-10G. You don’t need to know what that means, you just need to know to go SPN > MACRONIX > MC35L12805D
4 - Create a backup of your firmware
In AsProgrammer, Select the “Read IC” tool.
We’ll be erasing this firmware in the next step, and you really don’t want to do that without backing it up first. It’s also a good way to test that everything is working properly.
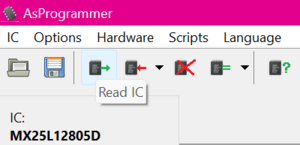
It will take a couple of minutes, and afterwards you should be able to see the firmware in the centre box. When it’s done, select “Save File” and save it wherever you want. If the firmware comes back with “F” or “0” at every point, see the “Troubleshooting” section at the end of the guide. DO NOT go to the next step before completing this step.
5 - Erase the firmware currently on the device
Select “Erase IC” and don’t touch it until it says it’s complete. The original firmware has to be erased so the new firmware can be programmed in its place.
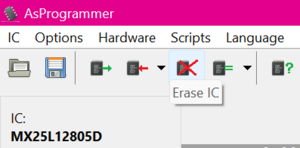
6 - Open the patch file
You should notice that the numbers and letters in the middle of the screen have slightly changed. If you look at the file path above the progress bar, it will say which file you have currently open.
7 - Select “Program IC”
This will program the firmware you just opened onto the device. Do Not interrupt the device while it's doing it, or you could brick it. Just leave it and wait until it's done. It should take a few minutes.
9 - Unplug the smart and test it
You can hold the back in place, no need to put the screws back in until you've confirmed it's working. Power the device up, and it should be in English!
Congratulations!
An Overview of AsProgrammer
AsProgrammer is actually very intuitive once you know what you need to do. I’ve labelled the most important stuff below:
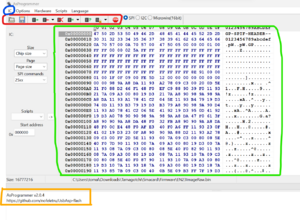
Blue - This is where you select the IC (In this case, MX25L12805D)
Red - From left to right:
[Open] [Save] [Read] [Program] [Erase IC] [Not needed for this x3] [Stop Button]
These are the tools you’ll need to use during this process
Green - This is where you’ll see any firmware you open/read. It’ll be a jumble of numbers and letters
Orange - This is where you can see the progress of what you’re doing. It’ll tell you when each step is complete, as well as any errors
Troubleshooting AsProgrammer can’t connect to the CH341A programmer
- Make sure you have the correct drivers installed. After installing drivers, try again. It should work
- If installing drivers doesn’t fix it, your programmer may be busted. Buy a new one
After reading the firmware, the results are just coming back as “F” or “0” for every point
The programmer isn’t getting a proper reading of the firmware
- Ensure all cables are connected in the correct place/the right way round
- Ensure you’ve selected the correct IC
- Make sure the clip is very securely attached to the chip
After patching, the device is still in Japanese
You either didn’t wipe the original firmware, or didn’t open the new firmware before programming
- Select “Erase IC” before programming
- Ensure you’ve opened up the English patch and try programming again (You can see which file you have open by looking at the file path above the progress bar)
I patched it, but now the device won't turn on/just displays a white screen
The patching has gone wrong at some point. You'll need to re-flash it, either using the backup you made, or the English patch